
RJ45 connectors are one of the silent accessories in a network that ensures your ethernet cables remain intact and data transmission occurs without a hitch. In fact, it is one such piece whose absence can hamper the efficiency of a person’s network, creating disruptions and exposing it to a lot of slowing down. As simple as it sounds, the process of attaching an RJ45 connector to a cable can indeed be very important to you, whether it is about surfing the usual internet or handling elaborate data transmission.
In this article, we will focus on the rightful, correct aspects of RJ45 connector wiring as related wirings with some basic instructions as well as standards in breaking most of the extensive cable connection issues for achieving a clear and stable network.
What is an RJ45 Connector?
The RJ45 connector wiring diagram is a common standardized interface in most Ethernet networking. It is the connector that appears on the other ends of Ethernet cables meant to interconnect computers, routers, and switches, among other networks, to create a local area network (LAN). The RJ45 connector has eight pins, which are used for the eight wires inside the twisted pair cable. The pins arrangement is essential when it comes to data transfer, this makes it easy for the RJ45 connector to be adopted in homes or businesses.
An RJ45 connector is an 8P8C (8 Position 8 Contacts) modular connector that is used widely in networking. This allows it to be exclusively used in the Ethernet wherre several interconnections need to be reliable to enhance the performance. I find it important to know what an RJ45 connector is and how it works as it is a basic knowledge that one needs first to master network cabling and guarantee that the network has the most efficient speed and reliability.
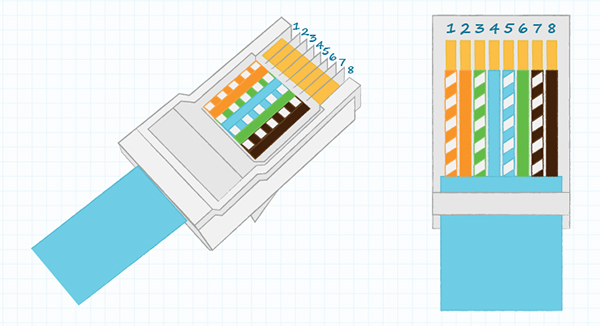
Understanding RJ45 Wiring Standards: T568A vs. T568B
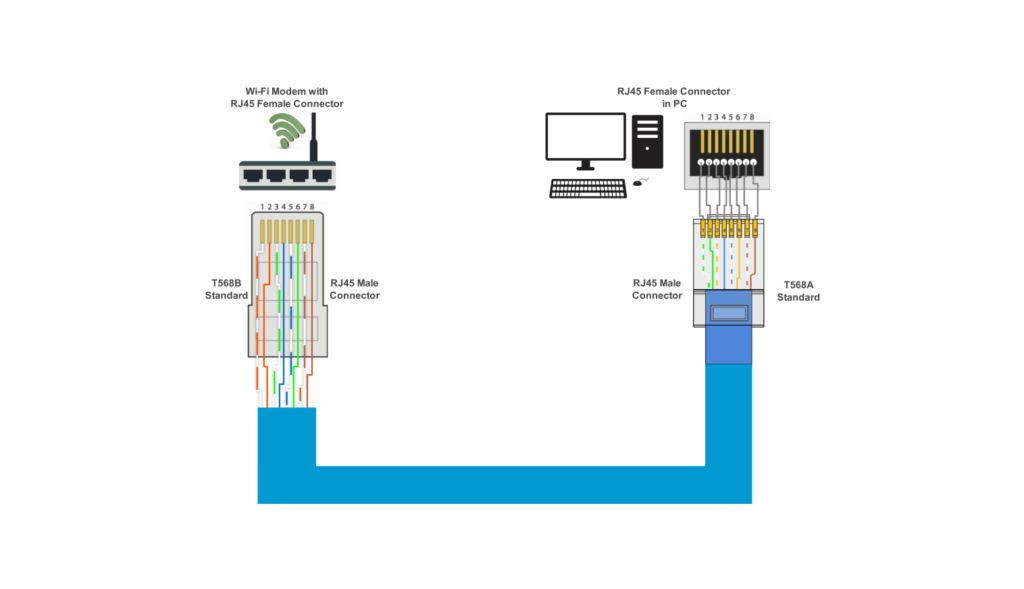
The two wiring standards of RJ45 connectors that you are going to encounter are T568A and T568B. These standards depict the arrangement made with the eight wires inside the constructor of the Ethernet cable and the order of inserting the wires in the plug head. Although the two standards aim at the effectiveness of the connectors, the differentiation lies within the arrangement and color of the wires.
T568A Standard: This wiring standard is less commonly used today but still has its relevance for example in some of the installations. T568A has the green pair of wires coming first then the orange pair in second position.
T568B Standard: This standard is the most common one due to its acceptance in most businesses. It is T568B where the orange pair comes first before the green pair.
What is the significance of these standards? If you are going to install multiple network cables, you need to be careful about the standard you apply. Otherwise, connectivity problems will arise. Although either standard may be adopted, most modern wiring tends to appreciate T568B as a preference due to its universal adoption and the compatibility of systems with it.
Sticking to the appropriate standard and applying it correctly will not only make the network functional, but also enhance the performance of the network to the optimal level.
Steps for the Wiring of an RJ45 Connector
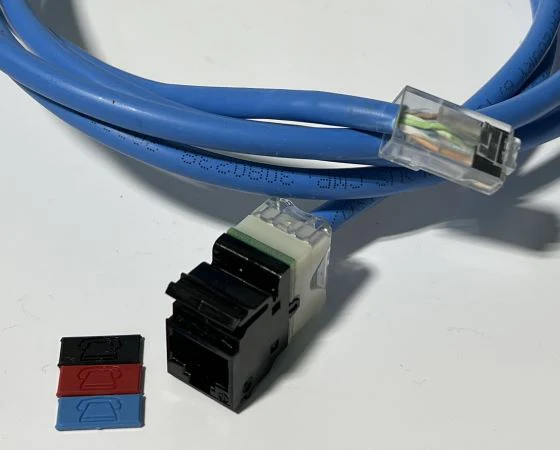
- Gather Your Tools: You’ll need a crimping tool, a wire stripper, an Ethernet cable (Cat5e, Cat6, etc.), and the RJ45 connectors.
- Strip the Cable: Using a wire stripper, strip approximately an inch long of the outer sleeve located at the cable tip that connects to the ethernet. The twisted pairs of wires within the jacket will be made available.
- Untwist the Wires: With care, untwist pairs of wires that are twisted together and such straightening will give the cables eight individual cables.
- Arrange the Wires According to the Standard: Depending on whether you are employing T568A or T568B, wires should be placed in the correct order for use. Make sure that they are flat as well as in-line with one another.
- Trim the Wires: Trim the wires evenly, leaving about half an inch at the edge of the cable.
- Insert the Wires: Carefully push the wires into the RJ45 connector. The wire jacket should also be pressed into the rear of the connector, but not deep.
- Crimp the Connector: Fit the RJ45 plug into the crimper and pull down hard to trap the wires within the connector. This operation ensures that the wires do not move out of position and that the connection is established.
- Test Your Connection: After crimping it, test the connection with a cable tester for correctness and check for possible wiring mistakes.
Following these measures will enable an efficient Ethernet cable connection while reducing the chances of running networking problems.

Benefits of Proper RJ45 Wiring
Below are the top benefits of the RJ45 Wiring.
Higher Network Speed: When the wiring is done correctly, there is minimum signal loss, and thus, more data is transferred in a given period.
Better Reliability: If the cables are correctly wired there will be less occurrence of dropped connections and also less incidences of network failure.
Sustained Stability: After the network installation, should the cables be correctly done, then there will be fewer problems in the network thus there will be less maintenance and longer time before the need for the replacement arises.
Reduced EMI: When the wires are appropriately twisted and oriented, the chances of this problem occurring are reduced, hence producing clear signals with less data distortion.
Compatible networking devices: Proper arrangement of cables guarantees that these cables will work well with all the available network devices such as routers and switches.
Save on upkeep costs: Reduction in the frequency of rewiring and remedial action needed on the network because of poor connections means maintenance costs are kept low in the long run.
These advantages suggest why the effort is worth making, in the beginning, to ensure that the RJ45 wiring comes out right.
Conclusion
Well-established wiring of RJ45 connectors plays a unique role in the success and reliability of any given network. Knowing why T568A is different from T568B and how to avoid twisting of wires during the assembly of the cables is quite helpful in making sure that Ethernet cables achieve their best attributes as far as systems are concerned.
Adhering to the basic principles and sophisticated strategies in this article makes it easy to enhance your network usage while minimizing the margin of error. Whether it is a simple home network or a multi-layered system, proper wiring forms the bedrock of any operational foundation.